Finding Superfish With Ziften App For Splunk

Written By Ryan Hollman And Presented By Charles Leaver CEO Ziften
Backgound: According to PCWorld, Lenovo admitted to pre-loading the Superfish adware on some consumer PCs, and unhappy customers are now dragging the company to court on the matter. A proposed class-action suit was filed late last week against Lenovo and Superfish, which charges both companies with “fraudulent” business practices and of making Lenovo PCs susceptible from man in the middle attacks by pre-loading the adware.
Having issues finding Superfish across your enterprise? With the Ziften App for Splunk, you can find infected endpoints with a straightforward Splunk search. Simply search your Ziften data and filter for the keyword “superfish”. The query is as follows:
index=ziften superfish
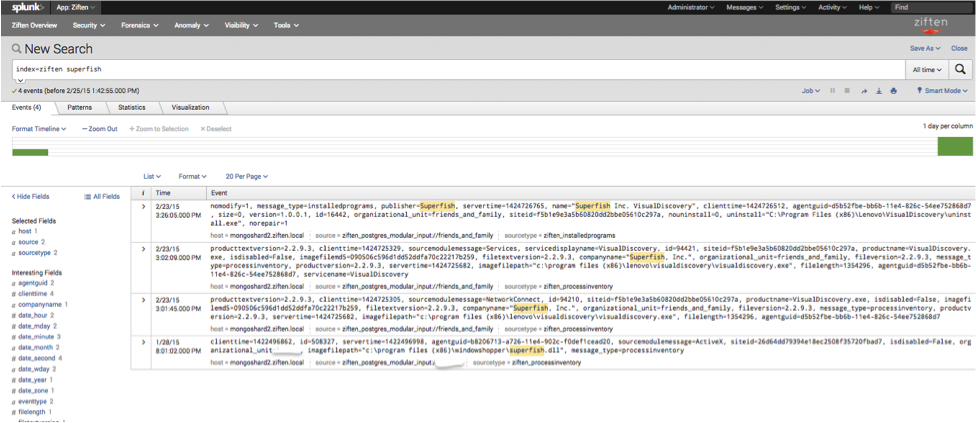
The following image shows the results you would see in your Ziften App for Splunk if systems were infected. In this particular instance, we detected multiple systems infected with Superfish.
The above results also make reference to the binary “VirtualDiscovery.exe”. As it turns out, this is the core process responsible for the infections. Along with the Superfish root certificate and VirtualDiscovery.exe binary, this software also lays down the following to the system:
A registry entry in:
HKEY_LOCAL_MACHINESOFTWAREWow6432NodeVisualDiscovery
INI and log files in:
%SystemRoot%SysWOW64VisualDiscovery.ini
%SystemRoot%SysWOW64VisualDiscoveryOff.ini
%SystemRoot%System32VisualDiscoveryOff.ini
%TEMP%VisualDiscoveryr.log
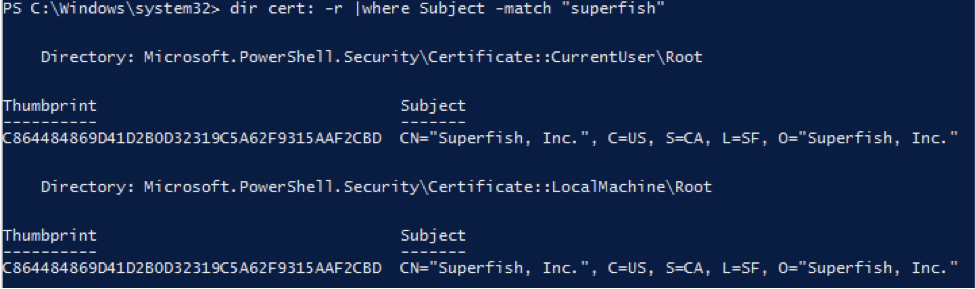
Manual detection of Superfish can also be done on an endpoint directly from powershell with the following:
dir cert: -r |where Subject -match “superfish”
If the system is infected with Superfish, you will see results similar to the following image. If the system is clean, you will see no results.
fish3
Some researches have stated that you can simply remove Superfish by removing the root certificate shown above with a powershell command such as:
dir cert: -r | where subject -match “superfish” | Remove-Item
This removal procedure does not persist across reboots. Simply removing the root cert does not work as VirtualDiscovery.exe will reinstall the root cert after a system reboot.
The simplest way to remove Superfish from your system is to update Microsofts built in AV product Windows Defender. Shortly after the public became aware of Superfish, Microsoft updated Windows Defender to remediate Superfish.
Other remediation methods exists, but updating Windows Defender is by far the simplest method.
Backgound: According to PCWorld, Lenovo admitted to pre-loading the Superfish adware on some consumer PCs, and unhappy customers are now dragging the company to court on the matter. A proposed class-action suit was filed late last week against Lenovo and Superfish, which charges both companies with “fraudulent” business practices and of making Lenovo PCs susceptible from man in the middle attacks by pre-loading the adware.
Having issues finding Superfish across your enterprise? With the Ziften App for Splunk, you can find infected endpoints with a straightforward Splunk search. Simply search your Ziften data and filter for the keyword “superfish”. The query is as follows:
index=ziften superfish
The following image shows the results you would see in your Ziften App for Splunk if systems were infected. In this particular instance, we detected multiple systems infected with Superfish.
The above results also make reference to the binary “VirtualDiscovery.exe”. As it turns out, this is the core process responsible for the infections. Along with the Superfish root certificate and VirtualDiscovery.exe binary, this software also lays down the following to the system:
A registry entry in:
HKEY_LOCAL_MACHINESOFTWAREWow6432NodeVisualDiscovery
INI and log files in:
%SystemRoot%SysWOW64VisualDiscovery.ini
%SystemRoot%SysWOW64VisualDiscoveryOff.ini
%SystemRoot%System32VisualDiscoveryOff.ini
%TEMP%VisualDiscoveryr.log
Manual detection of Superfish can also be done on an endpoint directly from powershell with the following:
dir cert: -r |where Subject -match “superfish”
If the system is infected with Superfish, you will see results similar to the following image. If the system is clean, you will see no results.
fish3
Some researches have stated that you can simply remove Superfish by removing the root certificate shown above with a powershell command such as:
dir cert: -r | where subject -match “superfish” | Remove-Item
This removal procedure does not persist across reboots. Simply removing the root cert does not work as VirtualDiscovery.exe will reinstall the root cert after a system reboot.
The simplest way to remove Superfish from your system is to update Microsofts built in AV product Windows Defender. Shortly after the public became aware of Superfish, Microsoft updated Windows Defender to remediate Superfish.
Other remediation methods exists, but updating Windows Defender is by far the simplest method.
The following image shows the results you would see in your Ziften App for Splunk if systems were infected. In this particular instance, we detected multiple systems infected with Superfish.
The above results also make reference to the binary “VirtualDiscovery.exe”. As it turns out, this is the core process responsible for the infections. Along with the Superfish root certificate and VirtualDiscovery.exe binary, this software also lays down the following to the system:
A registry entry in:
HKEY_LOCAL_MACHINESOFTWAREWow6432NodeVisualDiscovery
INI and log files in:
%SystemRoot%SysWOW64VisualDiscovery.ini
%SystemRoot%SysWOW64VisualDiscoveryOff.ini
%SystemRoot%System32VisualDiscoveryOff.ini
%TEMP%VisualDiscoveryr.log
Manual detection of Superfish can also be done on an endpoint directly from powershell with the following:
dir cert: -r |where Subject -match “superfish”
If the system is infected with Superfish, you will see results similar to the following image. If the system is clean, you will see no results.
Some researches have stated that you can simply remove Superfish by removing the root certificate shown above with a powershell command such as:
dir cert: -r | where subject -match “superfish” | Remove-Item
This removal procedure does not persist across reboots. Simply removing the root cert does not work as VirtualDiscovery.exe will reinstall the root cert after a system reboot.
The simplest way to remove Superfish from your system is to update Microsofts built in AV product Windows Defender. Shortly after the public became aware of Superfish, Microsoft updated Windows Defender to remediate Superfish.
Other remediation methods exists, but updating Windows Defender is by far the simplest method.
